hello, i wanted to show you the projects for the classes i will be teaching at Kaitlyn's Crop. you do not have to attend the crop to take classes; and there will be shopping also from multiple vendors. first up is my "SCHOOL RULES" photoFULL layouts class. you will make 2 - 2 page layouts… Continue reading classes for Kaitlyn’s Crop
Tag: scrapbook

happy mother’s day…
happy mother’s day to all you moms out there! we are celebrating early. our go to family restaurant for special occasions is Golden Wok - we all LOVE dim sum! so my mom doesnt miss church, we are going tomorrow. at some point i realized this meant i needed cards early too! lol! i started… Continue reading happy mother’s day…
JUST B CRAFTY conference
charlotte & i are at the JUST B CRAFTY conference in waxahachie this weekend. lots of shopping, classes and fun! there are still passes available for the crop. and shopping passed are only $5. come down & see us if you are in the area!

bluebonnets anyone???
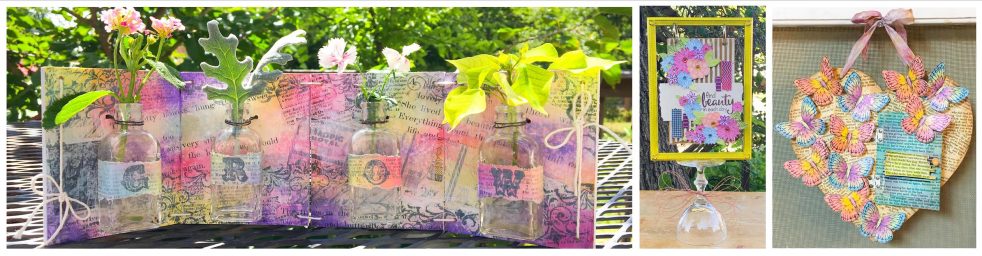
i’m taking a break from prepping my texas altered book. and by break i mean designing something else! a BLUEBONNET kit! this is one of the new kits that will be available @ the JUST B CRAFTY event in waxahachie. i used several shades of blue to bring out all the beautiful colors of bluebonnets… Continue reading bluebonnets anyone???
just b crafty conference
the JUST B CRAFTY CONFERENCE in waxahachie is coming up soon! april 30 thru may 2. charlotte and i will be selling our kits from T&C Paper Crafting. we'll have both ready to assemble kits as well as "last chance" already assembled kits for $10 each. i'll have some mini album and altered book kits… Continue reading just b crafty conference
classes @ JUST B CRAFTY
i will be teaching 2 classes at the JUST B CRAFTY conference in waxahachie, tx january 29-31, 2026. first up is my INTRO TO ALTERED BOOK class i am very excited to have the opportunity to share my techniques for creating altered books with easier and with less mess than traditional methods. in this intro… Continue reading classes @ JUST B CRAFTY

gift idea for the holidays
hello! it isn't like me to plan ahead, usually to my detriment! LOL! so if you are like me, i thought i'd share something with you. lately, i've been making canvas bags for friends at special crops or my students for classes. i say "make", but it's actually embelllishing. i purchased the bags; they were… Continue reading gift idea for the holidays
new new altered book!
i’ve been busy. i finished my LETTERS TO SANTA altered book and decided to use the same book design for a beach themed book. it uses the beach is calling from G45. like the christmas book, it includes ephemera i resourced and printed to coordinate with the papers. the book also includes lots of ribbon,… Continue reading new new altered book!
new altered book class
LETTERS TO SANTA altered book class: SIGN UP INFO & flip through video… class will be offered on both saturday nov 8 & sunday nov 9 from 9:00-3:30 each day. you only need to come ONE DAY, not both. i’ll be teaching the same thing on both days. charlotte has volunteered her new “Charlotte’s Web… Continue reading new altered book class

if you missed this class, now’s your chance!
i taught a vintage disney photoFULL layout class at GASC denton & CKC conroe and i have a few kits left. so… if you were interested in the class but couldnt make it to the event, nows your chance. i am listing them on my square app, so you can reserve and pay for a… Continue reading if you missed this class, now’s your chance!
