
hello!
welcome to the Clearsnap {Gold Foil} Blog Hop!
it’s titled “Gold Foil”, but you’ll see lots of foil colors besides gold used in projects on this hop. i used several different colors myself!
foil is HOT right now! you will find it embellishing everything from clothing to home decor and Clearsnap has some great products that you can use to BLING up YOUR projects!
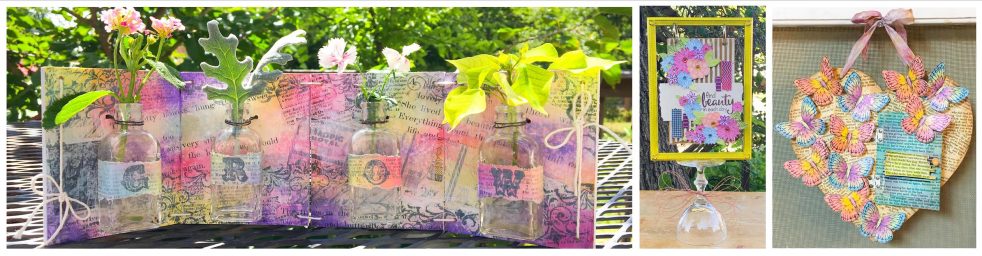
i am showing 3 quick and easy techniques to add foil accents to chipboard as well as a frame made using the pieces from one of the techniques.
TECHNIQUE #1: adding foil accents to chipboard using dry adhesive…

for this chipboard heart, i left it au natural. you could ink or paint it if you don’t like the look of the raw chipboard. the dry adhesive i used has a small “dot” pattern in it, which i like as it adds texture to the piece. i rubbed on the adhesive in different spots, and then burnished on the foil. filling in spots and overlapping them as i worked. you could also cover the chipboard piece completely with the adhesive first, then add the foil around in different areas, but i prefer the layered look i got working in small sections and slightly overlapping the adhesive and foils.
supplies:
Clearsnap: Designer Foils: Campfire, Lagoon and Cherry Pie
Grafix: Artist-Tac
Chipboard Heart
TECHNIQUE #2: adding foil accents using double sided tape…

i started with the same chipboard heart but this time, covered it completely with double sided tape. then i cut strips of foil and applied them diagonally on the heart. then i added strips of a narrow double sided tape going the other way and burnished on a different foil.
supplies:
Clearsnap: Designer Foils: Plum Crazy, Lagoon, Silver Fog and Winter Sky
Scor-Pal: Score Tape: Wide and Narrow Double Sided Tape
Chipboard Heart
TECHNIQUE #3: adding foil accents using Design Adhesives…

plain chipboard letters were first painted with Izink Inks. then once dry, Design Adhesives were applied to the letters and then foiled.
supplies:
Clearsnap: Design Adhesives: French Swirl, Designer Foil: Plum Crazy and Izink Ink: Tulip and Opaline
Chipboard Letters
here is a frame i made using the foiled “love” letters…

the frame was painted with Izink Ink. then Design Adhesives were applied in areas around the frame and then foiled. flowers and trim complete the look.
supplies:
Clearsnap: Design Adhesives: Ornate Border, Designer Foil: Siilver Fog, Izink Ink: Amethyst, Tulip and Opaline, ColorBox Pigment Ink: Burlap and Plum and ColorBox Stylus & Tips
Hydrangea Hippo: Pink Beaded Hoops
Foiled Chipboard Letters
Wood Frame
Flowers
Vintage Silver Cording
Paintbrush
here are a few hints to remember when working with the Designer Foils and Designer Adhesives:
* you can use ALL the foil on each sheet of Designer Foil. just keep applying it and moving to a spot that still has foil and applying again.
* you can use ALL of the designs on the Design Adhesive sheets too. you can cut them apart or just burnish off the portion you want, then move to apply remaining designs.
* surface must be DRY before applying Design Adhesives or Designer Foils otherwise they may not apply correctly.
* you can use a bone folder to burnish Designer Foils or Design Adhesives, but your finger works great.
i put together a Snapguide showing how to do each of the 3 foiling techniques on the chipboard pieces:
i also put together a separate Snapguide showing how to create the frame step by step:
watch for Valentine cards featuring the 2 foiled hearts on the Clearsnap Blog in february!
***** HOP LIST *****
Tami Sanders <<<<< You Are Here!
Clearsnap Blog <<<<< Go Here Next!!!
follow this link for your chance to win a prize pack from Clearsnap… a Rafflecopter giveaway
thank you for stopping by!


Tami, I love the frame! The design adhesives r really cool. Thanx for the tutorial!!!
Btw, r u doing the bus trip to Scrapbook Expo in Grapevine? Hope to c u!
Very pretty details! Love the inspiration!
Neat! Love how it turned out!
The frame is beautiful. Thanks for the tips on how to apply the foil. Looks like a fun product to use. Looking forward to getting some of it.
Wow! So many great ideas to use the foil on our projects! Thanks
Wow, your frame is so beautiful! I love the flowers and the way you decorated Love. Thanks for sharing.
Thank you for sharing this variety of techniques with the designer foil. I like how easy it is to add some lovely sparkle and shine.
So pretty – I love those little hearts especially!
I am new to foils–thanks for sharing these different techniques.
I LOVE that frame! The purple foil looks amazing on the swirls! And thanks for the step by step tutorials! Makes it easier to learn!