join the ClearSnap creative team all weekend long as we hop and scrap and hop some more!
our designers are bringing you a bundle of fun and lots of inky techniques for your scrapbook pages!
just hop through and leave a comment on each post. each designer is giving away their own prize pack so be sure to visit every blog on the hop!
entries close on monday may 6, 2013 at 12:00am…
hi! welcome to my blog!
i have a layout to share with you that features LOTS, and LOTS of inks and more from ClearSnap as well as several techniques. my layout started with 1 sheet of white cardstock, scrap kraft cardstock, manila tags, raw chipboard pieces, and some ribbon, twine and bits from my stash.
my challenge to myself was to turn plain unadorned pieces and papers into a colorful, collaged, nature-themed layout.
here’s the finished layout…
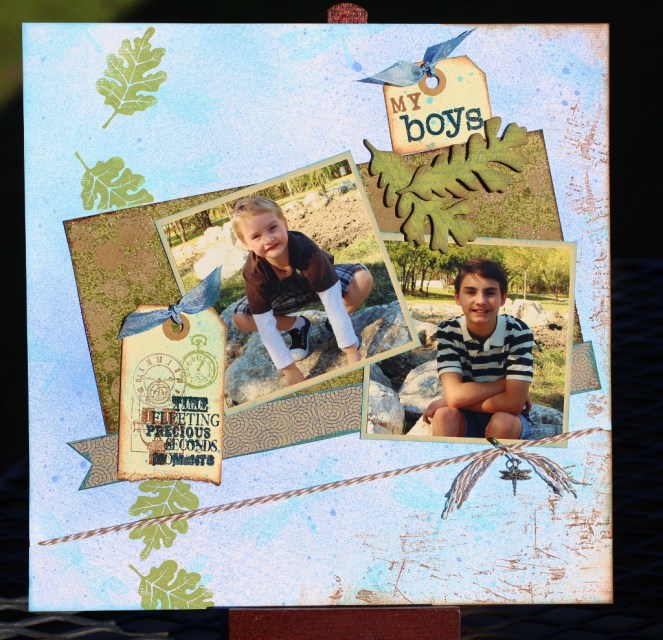
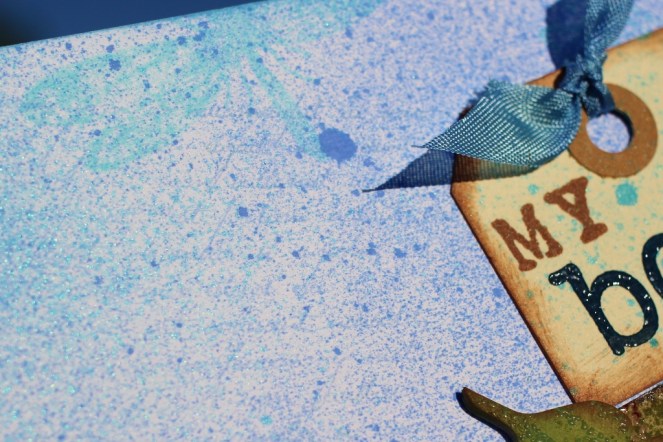
the white cardstock background was transformed into a bright, blue “sky”, by lightly spritzing it with Sea Kiss Smooch Spritz at the upper left and lower right hand corners, then filling in with ColorBox Sprays! in Sky. the combo of the aqua toned spritz and blue spray makes a very pretty sky, plus you get just a touch of shimmer from the spritz…

next, i wanted to add some tone on tone images to make the background more interesting, so i used the Rollagraph and Jumbo Say What? Stamping Wheel along with ColorBox Stephanie Barnard Premium Dye Ink in Sky to add a very subtle script pattern
and Mermaid ColorBox Archival Dye Ink was used to stamp some aqua dragonflies …
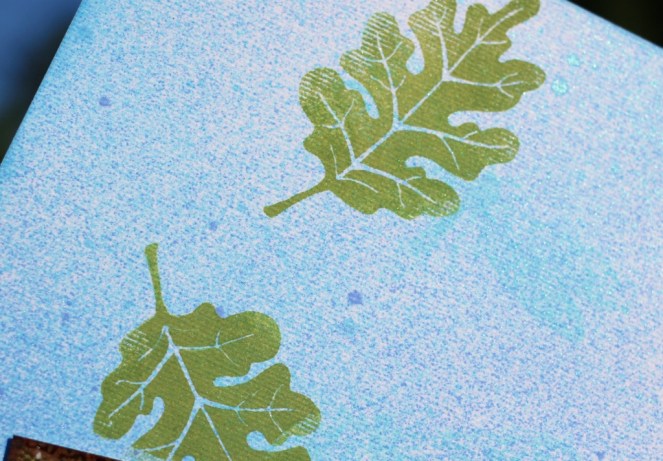
then the leaf pattern was added using Mint ColorBox Pigment Ink, which was heat set…
and a distressed design was added at the right side of the page to balance the leaves using ColorBox Chalk Ink in Chestnut Roan. a handy tip here to avoid having sharp edges when stamping a design like this is to only partially ink the stamp. this is easy to do using the ColorBox Stylus & Tips tool…

the edges of the background page were inked using both Chestnut Roan and French Blue Chalk Inks.
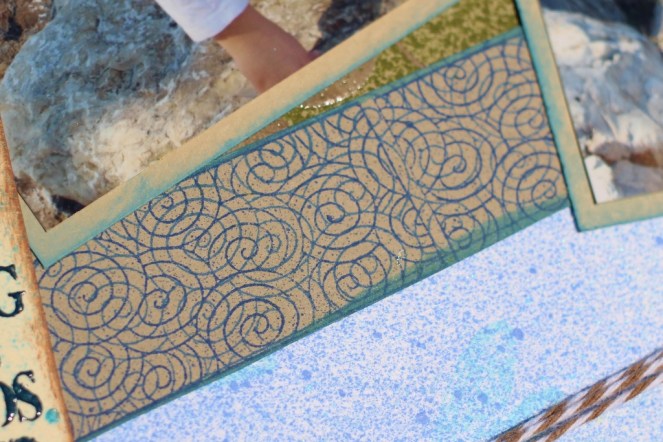
with the background done, it was time to move onto embellishing! i started with the photos, they were matted in kraft cardstock and the edges were inked using French Blue Chalk Ink. next, they needed a background to “rest” on, so i took a piece of kraft cardstock, added a pattern using the Rollagraph and Jumbo Mixed Dot Design Wheel with Watermark Ink. the design was embossed using Top Boss Clear Embossing Powder, then when cooled, was sprayed lightly with ColorBox Sprays! in Artichoke…

the manila tags were spritzed using Sea Kiss Smooch Spritz, then when dry, were stamped using Chalk and Pigment Inks. using several types of inks in layers produces an interesting contrast. for this tag, the clock was stamped with Chestnut Roan Chalk Ink, the watch in Mint Pigment Ink and the sentiment using Iris Pigment Ink which was embossed using Top Boss Clear Embossing Powder. a good hint when layering inks like this is to heat set as you go – especially if you plan on embossing a layer, otherwise, the embossing powder will stick to any ink that is still wet…

the border under the photos was made using the Rollagraph and Standard Design Wheel in the Chinese Noodles Pattern. one of my favorite things to do with the Rollagraph is to roll multiple images with it, sometimes in different colors as was done here. the design was rolled once using ColorBox Premium Dye Ink in Sky, then again using ColorBox Archival Dye Ink in Moody Blue…
the raw chipboard leaves were first inked using Mint Pigment Ink, then after heat setting, the script design was added and embossed using the Jumbo Say What? Design Wheel, Patina Mix’d Media Inx and Top Boss Embossing Powder. a little distressing around the edges using Chestnut Roan Chalk Ink finishes them off…

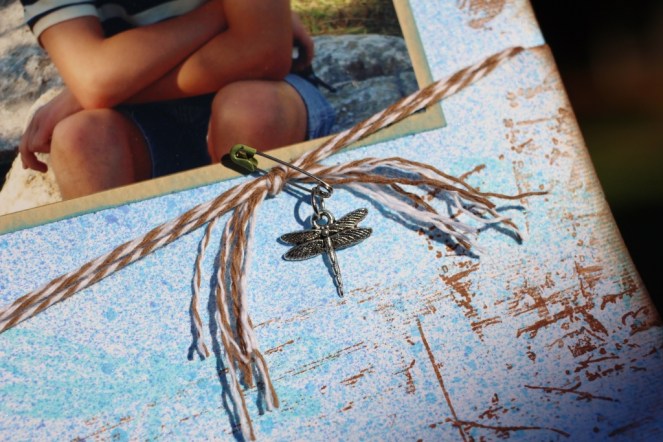
some baker’s twine and a charm finish off the layout…
i used a LOT of different products and a LOT of different techniques on this layout, but don’t feel you have to do the same! pick and choose what you like best and what works for YOUR layout! but the next time you can’t find “that perfect paper” for your project, think about making it YOURSELF!
SUPPLIES:
ClearSnap:
- Smooch Spritz: Sea Kiss
- ColorBox Stephanie Barnard Dye Ink Sprays!: Sky and Artichoke
- Color Catcher
- ColorBox Fluid Chalk Ink: Chestnut Roan and French Blue
- ColorBox Pigment Ink: Turtle, Iris and Mint
- Donna Salazar Mix’d Media Inx: Patina
- ColorBox Stephanie Barnard Premium Dye Inks: Sky and Blueberry
- ColorBox Archival Dye Ink: Mermaid and Moody Blue
- Watermark Ink
- Top Boss Clear Embossing Powder
- Rollagraph: Standard Handle, Jumbo Handle, Chinese Noodles Standard Design Wheel and Say What? and Mixed Dots Jumbo Design Wheels
- ColorBox Stylus & Tips
Other:
- Hampton Art: Time Pieces Clear Stamp Set and Weathered Background Wood Mount Stamp
- Artemio: #10001140 Postcard Clear Stamp Set
- Woodware: English Leaves
- My Sentiments Exactly: Multi Collage and Schoolhouse Lower/Number Clear Stamp Sets
- Bazzill: White and Kraft Cardstocks
- Beacon: Zip Dry
- The Twinery: Baker’s Twine
- 2 Small Manila Tags
- Vintage Blue Seam Binding
- Chipboard Leaves
- Dragonfly Charm
- Jump Ring
- Small Safety Pin
Tools:
- Trimmer
- Scissors
- Heat Gun
- Jewelry Pliers
- Double Sided Tape
i was the last stop on this HOP; but just in case you were visiting my blog by way other than the hop, you will want to start at the top of the list and work your way down so you can see ALL the terrific projects and ideas!
Clearsnap Blog http://clearsnap.blogspot.com/ – start here
Megan Aaron http://thoughtsoftraveling.blogspot.com/
Suzanne Austin http://whatsinalousyananut.blogspot.com/
Sabrina Alery http://sabrinaalery.blogspot.com/
Jennifer Priest http://hydrangeahippo.com/
Tami Sanders https://tamisanders.com/ – you are here now
don’t forget to leave a comment at each an every stop as EACH CT member will be selecting their own winner!
and also please “like” ClearSnap on Facebook, and follow ClearSnap on: Twitter, YouTube and Pinterest for MORE great project ideas and contest info!
and of course, please visit us on the ClearSnap Blog!
thanks!


VERY NICE!! LOve it!
LOVE this Tami!! You really worked Clearsnap!!
Fabulous! Love how you added the tag.
Great boy layout, thanks for sharing!
Great layout and a great use of products! Penny
Happy NSD!!!! I love the layout, great color inspiration and design, TFS http://pammejo-scrapbookflair.blogspot.com/
great layout for sure! I love seeing how you used the products!
Awesome layout! Thanks for sharing all the wonderful techniques.
What a layout! Always tougher to do boy designs for me. So many techniques. Thank for all the detailed explanations. I love it that you still use the Rollagraph.
Great layout, thanks for sharing! Happy NSD too!
Awesome display of multiple inking techniques. Loved the tags the best!
Wow! This is great! I never realized just how much thought and how many tools and supplies could go into making a page. My brain started spinning! lol
You did an amazing job, love the layout!
When I see a layout like this I appreciate all of the work that goes into it. Lots of steps and little details. What a work of art you have created!
By Jove! I believe you nailed your self-imposed challenge! Incredible layout! Love the Patina Mix’d Media Inx! Beautiful color! Happy NSD and thanks for sharing a piece of your world with us!
Love how you made your background without a single scrap of DP !
what a great layout!!!!
Love the layout and the embossing you shared!
Lovely Layout! Thanks for sharing :)
Fabulous layout – you certainly met your own challenge – love it!!!
Thank you for sharing the steps of your creative process – I have learnt a lot along the way and look forward to trying out these techniques soon :)
Thank you for the chance to win too :)
So many great techniques on this layout! Loving the colors and all the textures/products you utilized!
Fun layout. TFS
What an awesome technique filled page!!
What a great design! I love the stamped leaves that echo the chipboard ones and the different ways you used stamping and spritz to add color and patterns.
Cute page, I love all the stamping and making your own paper. I have so much paper to get through it’s not even funny!
You are so right – when you can’t find the right paper in your stash – time to break out the supplies and make your own. Those blues you chose are some of my fav colors…
Great layout! Love the distressing and the mists.
Great page.
Gorgeous! Love all the colors and textures!
I wish I had read your blog before I tried some of these things.
Thanks for the encouragement to create paper backgrounds and for sharing your techniques. Lovely.
Really great examples of inking techniques i’m simply going to have to go and try for myself. Helps to have inks to work with so I’m still trying to build up my supplies. Lovely layout!
The background is amazing, nice effect, thanks for the technique